Hello everyone I am mega late today it really has been one fo those days so I'm gonna get on with my post for you. Last week I said I would be back today with a tutorial for you. Well here it is I have put together a tutorial for the 'Tissue Box' I made on my 1st posting for Crafts & Me.
There are a lot of piccies in this post cus I have tried my best to explain all of the steps, if however you get stuck or something isn't clear then simply e-mail me & I will help out any way I can. My e-mail address is on my blog in my contact page.
Materials you will need are as follows;
Score Board
Paper cutter & scissors
Glue & double sided tape
Nestabilities
3 Sheets of A4 card
Designer Paper 6x6 or larger & you will need 6 sheets, 2 designs 3 sheets of each design.
Lace or edging
For every little black mark in between the numbers I call it a quarter....not sure if thats right or not. I've also drawn down each score line with a pencil, you dont need to do that I've just done it this way so you will see the score lines easier & I've also wrote on the card at which points to score i.e pic shown above means score at 5 1/4 which is the first little mark after 5.
So place your A4 card longest edge along the top of your score board & score at points shown below.
Turn the card so that the shortest edge is along the top & score down at 6.
Rotate it back the way it was & cut out the bottom corner like in picture below.
Then cut a slit on the middle score line cutting up to the 1st score line going across.
On the right side cut the corners away like shown...only do the right side.
Now repeat each of these steps on your 2nd piece of A4 card.
Now fold along all the score lines.
So now you should have this...
On 1 piece of card either attach double-sided tape or glue to the end strip as shown below.
Glue is firmer & more secure I have used tape for quickness.
Lay the 2 pieces of card side by side & the strip you have put the glue on attach to the 2nd piece of card as shown below.
Distress all edges & folds with ink. I have used 'Tea Dye' distress ink.
When you have distressed all edges you can put your designer paper on at this point or leave it til the end. I have left mine until the box is made up.
Attach glue or tape to the end strip as shown above.
Then fold the other side in attaching it to the strip you have just glued. This should then form the box.
Turn the box upside down & on the flaps where you have cut the corners off attach glue along the 2 sides.
Then fold all sides in making sure the ones you have put glue on are folded in last as shown above.

If you wish to strengthen the bottom cut a piece of card to the same measurement as your box & glued it to the bottom. I have used a paler colour card so you can see easier what I mean.
Next we move onto the lid. So for this you will need your 3rd piece of A4 card & score as shown in picture below.
Turn the card 90 degrees & do the same score lines.
On each corner cut a slit as shown below, 1 slit in each corner tab.
Now fold each score line.
For the next step you will need your nestabilities. The shape is entirely your preference as this will be the hole where your tissues come out.
Make sure you have your nestie in the middle & make sure it is not larger than the opening on your tissue box.
Next step is to distress all edges like you did to the box.
Have ready the papers that you will be using to decorate, choose papers that will co-ordinate with your image. I always work back to front & colour my image then choose my papers lol.
For my image I have used 'Flapper Girl Melody' which I got for crimbo off hubby, you can get this stamp from here. For my images I use this card here, its smooth so colours blend easily & I dont get any bleeding & I can also use it for my digi images as well, it goes through my printer with ease.
You can distress 1st then attach your designer paper before cutting your shape out I just forgot which is why I've done it this way lol.....either way will work the same though. So once you have distressed all the edges then attach your paper of choice. Then turn it upside down & place the same nestie as used before into the cutout & run throught your die-cutting machine. This will then cut the shape out of the paper.

Put some glue on all 4 corners of your lid & then fold in to glue it all together as shown below. I use either paper clips or mini pegs to hold it in position while its drying.
While the glue is drying you can decorate your box if you havn't done so already.
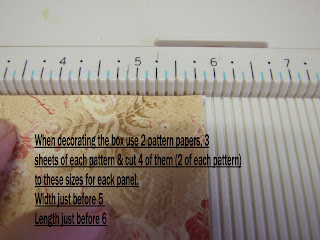
You will need your 6 sheets of paper 2 sheets of each design are for the box leaving 1 sheet of each design for the lid.
I cut the sheets just slightly smaller than the panels on the box.
When the glue on the lid is dry its then time to attach the lace or edging which ever you are using.
You can either cut into 4 strips, 1 for each side or 1 long continuous strip to go all the way around.
Each strip should be just slighter longer to avoid having gaps in the corners.
Excuse the choccy in the pic I needed a fix lol.
To make measuring the strips easier I cut a piece of card from my discarded pieces the same length as I want each strip to be. I just find it easier than putting each strip against my ruler.
Glue along all the bottom edges of the lid & then attach your lace.
You can also use paper lace which ever is your preference.
You can now decorate the lid to match your box.
Here is my completed tissue box.
I have cut around my image & attached it to card cut with the same shape nestie as used on the lid. It helps to make the image pop out a little bit more. The papers I've used are K&Co.
I made a butterfly for the back using a Marianne die. I then did different heat embossing & attached pearls to the body.
This is the lid all finished. You can decorate as little or as much as you want.....keep it simple or lavish it with flowers & embellishments the choice really is yours.
Well that is it for my tutorial I hope you made it to the end, get yourself another cuppa if you did lol.
Thankyou so much for looking at my tutorial & I hope it was ok. I'm still not used to doing these, this isonly my 2nd now so its took me a few hours to do this as well as what it took to make the box lol. I'm sure I will get quicker lol......I hope so. This box will take a standard square box of tissues it is slightly bigger though to accomodate any that are slightly larger. Any questions please feel free to e-mail me & I will gladly answer any questions I can.
Dont forget the challenge 'Tearing' we still have going over here.
Tatty bye for now & I hope you enjoyed my tutorial.
Huggles


Great tutorial Vicky, I shall have to try this one I love the finished results, I just hope mine looks as good as yours, I bet it don't!
ReplyDeleteTeresa x
What a beautiful tissue box.
ReplyDeleteFabulous Tutorial.
Hugs
Penni
X
Wow ! so fabulous ! Thanks for this tuto !
ReplyDeletexxx
Fabulous Tutorial and fabulous tissue box. You are very inspiring. xx
ReplyDelete