Evening all! I've finally got kids to sleep so I can sit down on PC! Its my youngest birthday tomorrow, little miss mookins will be 3! Goes so so quick!
I have a little tutorial for you tonight for those of you already familiar with merging a couple of digi stamps together. This one is using digis with background images like photos or digital papers.
I use Paint Shop Pro 9 but peeps using other programs may be familiar with the controls so here we go! You should be able to get a full size view by clicking on the pic to get a better look.
I've used FOREST FRIEND DIGI for the example.
Step 1 - Open your digi image - Its IMPORTANT TO USE THE JPG VERSION for this technique as the png is transparent and you don't want that, you want the white on it to colour in :)
Open your background image such as a photo or digi background and make copies of both to work with and close original off.
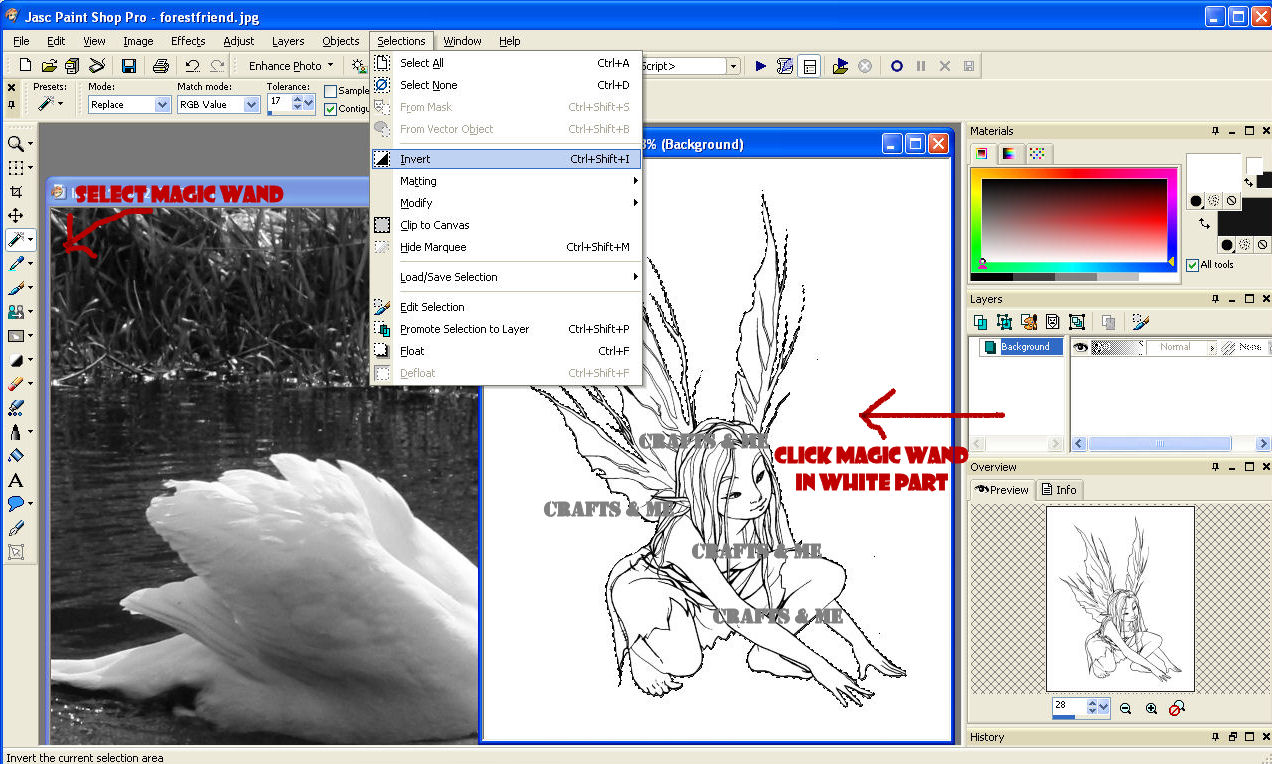
SELECT MAGIC WAND
CLICK IN THE WHITE BIT OUTSIDE YOUR DIGI STAMP
CLICK SELECTIONS THEN INVERT
This will put the 'marching ants' around your stamp then click EDIT - COPY (Or presas control & C)
![]()
![]()
STEP 3 - Here's the fun bit! Make sure you click on Raster 2 in the layers box then click your MAGIC WAND then select a white area you want to show through such as the wings. I do mine piece by piece as you'll see in the pic below, the marching ants are around the area I'm working on.
Once selected go to tools on the right then select the ERASER TOOL from the TOOLS menu on the left. The eraser settings will appear and you can play around with these. A 0 opacity is completely see through while 100 is solid. I wanted a not quite see through effect so chose 95 opacity and 27 density then erased gently leaving the very edge white.
![]()
![]()
I have a little tutorial for you tonight for those of you already familiar with merging a couple of digi stamps together. This one is using digis with background images like photos or digital papers.
I use Paint Shop Pro 9 but peeps using other programs may be familiar with the controls so here we go! You should be able to get a full size view by clicking on the pic to get a better look.
I've used FOREST FRIEND DIGI for the example.
Step 1 - Open your digi image - Its IMPORTANT TO USE THE JPG VERSION for this technique as the png is transparent and you don't want that, you want the white on it to colour in :)
Open your background image such as a photo or digi background and make copies of both to work with and close original off.
SELECT MAGIC WAND
CLICK IN THE WHITE BIT OUTSIDE YOUR DIGI STAMP
CLICK SELECTIONS THEN INVERT
This will put the 'marching ants' around your stamp then click EDIT - COPY (Or presas control & C)
STEP 2 - Click onto your background image and select EDIT - PASTE - PASTE AS NEW LAYER
(You may have to fiddle around with the size and resize your digi to fit before pasting)
You will see your new layer in the layers box (On right hand side here) called Raster 2. You may choose to stop at this but if you want part of the background showing through the top layer then keep reading!

Once selected go to tools on the right then select the ERASER TOOL from the TOOLS menu on the left. The eraser settings will appear and you can play around with these. A 0 opacity is completely see through while 100 is solid. I wanted a not quite see through effect so chose 95 opacity and 27 density then erased gently leaving the very edge white.

Here's the final effect of the wings, pretty huh!

And the image coloured in. The swan is a photo I took in black and white on the canal near home. I added some colour to the water and grass bank with promarkers and sakura stardust.
![]()
![]()

And another ready for colouring. The photo is of the trans pennine trail at the back of mine when we had that heavy snow earlier this year

These two are on digital background papers, same technique. This one is Twilight Lily Fae digi


Hope you understood that! I know a lot of you can already merge images quite easily so thought I'd show you a new trick ;)
Vix


Wow Vix, thanks so much for this great tutorial!
ReplyDeleteWill try it as soon as I have some time!!!
{hugs} Sylvia
This is brilliant Vix, I am sure this will be very helpful to lot's of crafters out there and your cards look fantastic.
ReplyDeleteTeresa x
Thanks for this great tutorial- there's only one problem with it... I think it may have caused me thinking about having to invest in a good software... I Love the effect you used for the Wings!
ReplyDeleteThanks again
Hugs
Kaos
GDT
OMG ! it's superb ! I don't know to do that, it's so beautiful ! Thanks !
ReplyDeletexxx
Wow fab tutorial Vix thanks for sharing. I hope your little had a fab birthday. luv gina xx
ReplyDeleteFabulous tutorial. I have been wondering how to do this and now you have given me the info to try it out. Thanks a lot hun. Hugs...Mona
ReplyDeleteGreat tutorial Vix and just love the results. Hugs Tracy x
ReplyDelete