Showing posts with label Twilight lily Fae. Show all posts

Wednesday, 18 January 2012

Fairy Love Just for You

Hi Everyone, Hope your all well.  Today I am showing you a new cool Digital Stamp from Crafts and Me.  This one is called Fairy Love and is available now.

So it's a Silhouette... and you may have noticed that mine is white... Yeah.... cool huh... you wanna know how I did it?? easy actually... but first take a look - I hope you love it as much as me!!!


Ok so this is how I turned the black fairy love silhouette into a white one.... first of all I went into my photoshop and fiddled a bit... I was trying to change the colour there, but I didn't figure it out... so... what I did instead was flip the image... then I printed it out on some white card.  Then I carefully cut her out... Hey Presto!!! when you flip the paper over - she is now white!!! heheheh I then chucked on heaps of sparkly glitter, and then had a look through my masses of off cut papers... (I really need to use them) so I found what I wanted and set about making the card!! Glued on a Prima Butterfly some pretty Kaiser and Wild Orchid Crafts Flowers, cut a tag and stamped on a sentiment, and to pretty it up tied on an Angel Charm!!

My next card i want to show you, is my last Challenge card that I did for the Bumper Christmas Challenge - did you enter?? I think everyone did from the amount of entries we had!!

So this one is using Twilight Lily Fae I love this one, with the lantern, so pretty.  I've coloured her up with mostly my G copics and I did her wings with the Mint Atyou Spica Pen... I sure do love my sparkles - if you hadn't noticed!!! Anyway this one is kinda plain, as I wanted it to be all about the image:-)


Thanks for looking and I hope you have had a great start to 2012.  For us we have finally started building our new House... so it's all systems go there.  Hopefully it will be finished in about 6 months or so, which means that we will be moving in the middle of our winter... joy... but it's going to be so wonderful, I'm getting my very own proper Craft Room - YAY for me:-)

Anyway till next time, take care
Hugs
Karen
xxxx

Saturday, 24 December 2011

Merry Christmas to everyone!

Here in Norway we are celebrating Christmas day today, the 24th.  I was scheduled to work for a few hours today but my sweet boss managed to find someone that wanted to take my shift. So now my day isn`t going to be so stressful after all.

I am sorry but i haven`t had the time to make a new creation for today`s post, so i thought i would show you some of my previous makes for Crafts and Me. I have selected a few creations that are my favourites of my Crafts and Me makes.


The first card i want to show you is the card i created for the last digi-challenge. Since i wanted to show off this gorgeous image a little better i went for a 8x6 inched card in traditional Christmas colours. The image is called Poinsettia and is available here.


My second card i posted her in the shop blog a while back. I think this is one of my fav Sara Burrier images. She looks truly divine. She is called Twilight Lily Fae and she is available here.


This 3rd card is called The Talisman and is a card i created for the "lace" challenge back in august. I just love the colour combo of this card. You can find this super sweet image here.


My last card today i created for the "Use a digi" challenge. The image is called Lady of Opal and she is available right here. I noticed i only had picked cards using Sara Burrier images, lol. Well...she is my fav artist, so it isn`t so strange anyway, lol.

Well...now we`re soon off to my mother in law. Usually we are celebrating Christmas at home but since i originally was going to work today we had arranged to go and visit my hubby`s mother for Christmas. Lucky me don`t have to slave over the stove either today, hahaha. I wish you all, and especially my fabulous team mates and Teresa, a very merry Christmas. I wish for you to get a lot of crafty stuff under the Christmas tree, lol!

When you have the time there is still plenty of time to enter our big bumper Christmas challenge. The theme is anything goes. And there is a yummy lot of 6 prizes up for grabs!!!! Isn`t that magnificent? Hop over to the Crafts and Me challenge blog and join in on the fun.

Well, that`s it from me. Untill next time...


Thursday, 23 June 2011

Tutorial - Merging a digi over a printed background

Evening all! I've finally got kids to sleep so I can sit down on PC! Its my youngest birthday tomorrow, little miss mookins will be 3! Goes so so quick!

I have a little tutorial for you tonight for those of you already familiar with merging a couple of digi stamps together.  This one is using digis with background images like photos or digital papers.

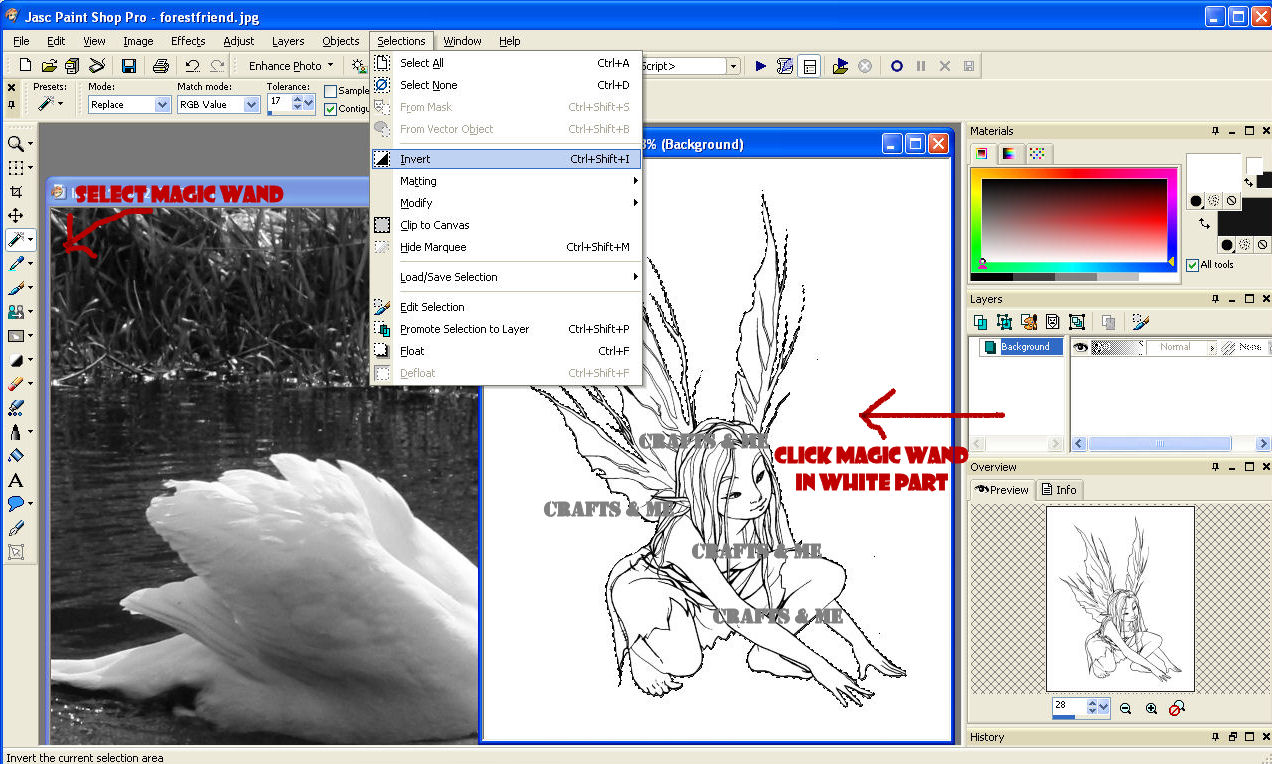
 I use Paint Shop Pro 9 but peeps using other programs may be familiar with the controls so here we go!  You should be able to get a full size view by clicking on the pic to get a better look.

I've used FOREST FRIEND DIGI for the example.

Step 1 - Open your digi image - Its IMPORTANT TO USE THE JPG VERSION for this technique as the png is transparent and you don't want that, you want the white on it to colour in :)

Open your background image such as a photo or digi background and make copies of both to work with and close original off.

SELECT MAGIC WAND
CLICK IN THE WHITE BIT OUTSIDE YOUR DIGI STAMP
CLICK SELECTIONS THEN INVERT

This will put the 'marching ants' around your stamp then click EDIT - COPY (Or presas control & C)

STEP 2 - Click onto your background image and select EDIT - PASTE - PASTE AS NEW LAYER
(You may have to fiddle around with the size and resize your digi to fit before pasting)

You will see your new layer in the layers box (On right hand side here) called Raster 2.  You may choose to stop at this but if you want part of the background showing through the top layer then keep reading!


STEP 3 - Here's the fun bit!  Make sure you click on Raster 2 in the layers box then click your MAGIC WAND then select a white area you want to show through such as the wings.  I do mine piece by piece as you'll see in the pic below, the marching ants are around the area I'm working on.


Once selected go to tools on the right then select the ERASER TOOL from the TOOLS menu on the left.  The eraser settings will appear and you can play around with these.  A 0 opacity is completely see through while 100 is solid.  I wanted a not quite see through effect so chose 95 opacity and 27 density then erased gently leaving the very edge white.


Here's the final effect of the wings, pretty huh!


And the image coloured in.  The swan is a photo I took in black and white on the canal near home.  I added some colour to the water and grass bank with promarkers and sakura stardust.
And another ready for colouring.  The photo is of the trans pennine trail at the back of mine when we had that heavy snow earlier this year

These two are on digital background papers, same technique.  This one is Twilight Lily Fae digi


Hope you understood that!  I know a lot of you can already merge images quite easily so thought I'd show you a new trick ;)

Vix

Thursday, 19 May 2011

A Fairy and a Bride

Hi everyone.  Angela here and today is my turn to show you what have created this week to share with you.  I have 3 cards to show you today.  The first one I have to share with you I used one of the new Digi's by Sara Burrier called Twilight Lily Fae and you can get her HERE at Crafts and Me.


I used some of the new DCWV paper stack called Lemon Flower.  I added some Recollections big satin flowers and small roses.  I used some Garland that I cut off and added to the side, some silver ribbon trim, green rhinestones and stickles.


For this card I used Art Deco Bride/Flapper and you can get her HERE along with other gorgeous Art Deco stamps.


I added some feathers, tulle behind and around the circle patterned paper, some Wedding wired beads, recollections grayish purple flower, spellbinders label die, chalk, punch out letters coverd in midnight glitter glue. 
The image was colored with copics YR0000,YR000,E21, V17,V25,V20, V04, C8,C7,C5,C3,C1.


Here is the card from our Rockin Rubber Crafts and Me Challenge last week using Hannah Lynn's
Marna Fairy, unmounted rubber stamp.

Thanks for stopping by today and I hope you have a wonderful day.  I also hope you get a chance to play along with the Digi DT challenge this week.

Saturday, 14 May 2011

Twilight Lily Fae

Hey everyone!

Mona here again! I am so sorry that my post is a bit late. It has been a real crappy week and it got topped by blogger being awol. It`s typical when i have a work-weekend that something like this happens. So i was not able to scedule my post. I hope you bear with me.

For my first card today have used another one of the brand new digis designed Sara Burrier. It`s called Twilight Lily Fae and it is available right here. I struggeled a bit with the colouring but the end result was not too bad.


I also want to show you my card for the digi team`s last challenge. I used the new "Natalie" digi-stamp, which you can fnd here. I really love the royal blue colour and it made tha card pop a bit more. I hope you got inspired by my cards. And while you are in a creating mood please feel free to jump on over to the challenge blog and join us for the punching challenge set by the rockin rubbah team! Can`t wait to see your creations. Have a nice weekend.