So first up the photo tutorial.You will need:
Die cutting machine or ready cut die shapes
1 large scalloped oval die
2 plain oval dies, 1 large and 1 medium
5 A4 pieces of card, 3 in one colour, 2 in a contrasting colour (a heavy cardstock works better)
Patterned paper of your choice ( i have used 5 sheets of 6x6)
Your ready prepared coloured image
Double sided tape and foam pads
Embellishments and sentiment of choice.
Here goes.
Start with a piece of A4 card (out of your 3 sheets) and fold it in half and crease with a bone folder.


Use a little sticky tape to hold your die in place so it doesn`t move.

Once you have run your die through your machine, you will have your oval shaped card blank.

Open your card and fold the top half down to the centre and crease the fold as you do for a normal easel card.

You now have your main easel shape.

You will now to need to cut 4 more large scalloped ovals, the same size you used for your easel card base.

In your contrasting colour card cut 4 of your large plain ovals and also 1 large plain oval of your backing paper,

Using the medium sized plain oval die cut another 4 sheets of your patterned paper.

Matt and layer up 3 of your large scallop ovals, large plain ovals and medium paper ovals.

Matt and layer one of your large plain ovals and medium paper ovals.

Now using your last large oval and large paper, mount up adding your image last.

Now its time to assemble.I have stuck the plain oval and paper to the bottom of the easel and you need to apply double sided tape to the folded over half of your easel.

Attach one of your ready matted ovals.

With your next 2 ready ovals, turn over and apply a little double sided tape but only on the inside edges.

With your card opened out, attach your oval overlapping the one you have just attached.

Then do the same with your other oval on the side so it looks like this.
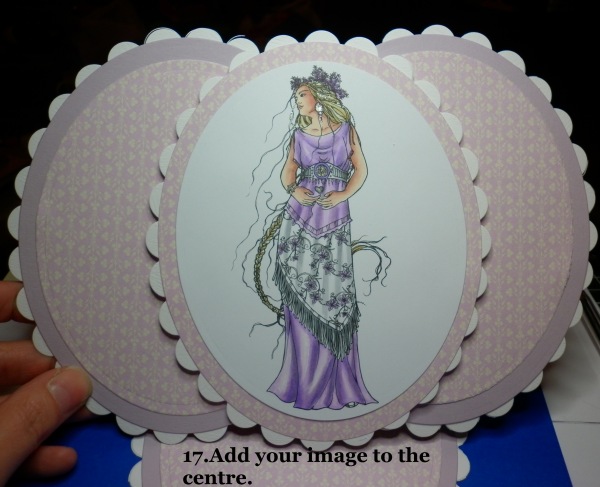
Add your image oval to the centre, i like to use to foam pads for this bit.

Finally add a sentiment or embellishment to act as a stop for your main easel.I use a sentiment as you can raise it on foam pads.
Then embellish how you like, one tip is to try and keep your embellishments to the centre of the card or it can tip it over if its too heavy on the outside.

And heres my finished card, i have used the beautiful Phlox Princess by Sara Burrier available HERE at the Crafts and Me store.
My 2nd card for today is using the stunning Unveiling the Heart by Sara Burrier available HERE at the Crafts and Me store.

This is the card i made for the current Crafts and Me challenge which you still have a little time to enter.Click HERE to see the fantastic DT cards and do pop back in the morning for a new challenge.
Gorgeous isn`t she.
Thanks so much for visiting and do pop on over to the Crafts and Me store and see all the goodies that Teresa has to offer.
Hugs Coops.xx


Wow what a beautiful card xx Jan
ReplyDeleteOooh Nic these are beautiful love the first one very unusual and I just love the 2nd one that isn't a card it's a work of art gorgeous stunning images
ReplyDeleteJacki xx
Fab tutorial and result ...both cards are absolutely stunning :
ReplyDeletexx Hugs Lizzy xx :)
Great tutorial. Gorgeous cards.
ReplyDeleteSarah
'Tis absolutely stunning, Coops! WOW! TFS! Hugz, ~ Rose
ReplyDeleteHow gorgeous! Thanks for the tutorial, too.
ReplyDeleteBe blessed, Beckie
Great tutorial Coops,Thanks I will be giving this a go.:0Jacqueline.S
ReplyDeleteStunning cards both of them, sweetie! Awesome tut. Thanks for sharing. I will have to try this one out. Hugs...Mona
ReplyDeleteIt is ages since I made one of these. I was inspired by Coops last time I made one. Great Tutorial and I absolutely love the card! Judy x GDT
ReplyDelete