Wednesday, 29 August 2012

Monarch Mermaid by Hannah Lynn

Hi Everyone, It's Karen here and today I want to show you a cool image designed by Hannah Lynn - this one is called Monarch Butterfly.

I've coloured her up with my copic's and added some sparkles to her gorgeous blue and yellow wings!!  My card is pretty CAS which is something I rarely do so I hope you all love it as much as me....


Monarch Mermaid is available in the store right now!!! and don't forget it wont be long and there will be more new images available - always on the 1st of each month - how cool is that?

Don't forget that a super cool and brand new challenge has just started over at the Crafts and Me Challenge Blog - so get your caps on and think of a really cool creation to add in to all the fun!!!!

Thanks so much for looking and till next time
Happy Stamping!!
Karen
xxx

Tuesday, 28 August 2012

Phlox Princess (including triple oval easel card tutorial) and Unveiling the Heart

Good morning all.I hope you have had a good Bank Holiday weekend.Today i (coops) have a tutorial to share with you on how to make a triple oval easel card.I have done a step by step photo tuturial so this post is photo heavy.
So first up the photo tutorial.You will need:
Die cutting machine or ready cut die shapes
1 large scalloped oval die
2 plain oval dies, 1 large and 1 medium
5 A4 pieces of card, 3 in one colour, 2 in a contrasting colour (a heavy cardstock works better)
Patterned paper of your choice ( i have used 5 sheets of 6x6)
Your ready prepared coloured image
Double sided tape and foam pads
Embellishments and sentiment of choice.

Here goes.
Start with a piece of A4 card (out of your 3 sheets) and fold it in half and crease with a bone folder.

Place your die on to your machine, my crease is at the bottom here.Leave a little of your die showing so you can create your oval shaped card blank.
Use a little sticky tape to hold your die in place so it doesn`t move.
Once you have run your die through your machine, you will have your oval shaped card blank.
 
Open your card and fold the top half down to the centre and crease the fold as you do for a normal easel card.
You now have your main easel shape.

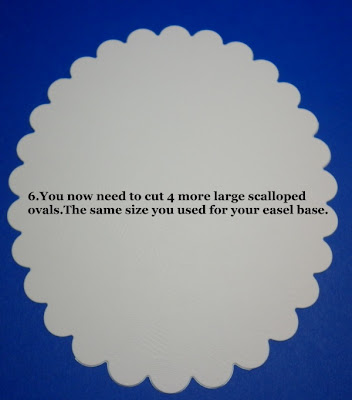
You will now to need to cut 4 more large scalloped ovals, the same size you used for your easel card base.
 
In your contrasting colour card cut 4 of your large plain ovals and also 1 large plain oval of your backing paper,

Using the medium sized plain oval die cut another 4 sheets of your patterned paper.

Matt and layer up 3 of your large scallop ovals, large plain ovals and medium paper ovals.

Matt and layer one of your large plain ovals and medium paper ovals.

Now using your last large oval and large paper, mount up adding your image last.

Now its time to assemble.I have stuck the plain oval and paper to the bottom of the easel and you need to apply double sided tape to the folded over half of your easel.

Attach one of your ready matted ovals.

With your next 2 ready ovals, turn over and apply a little double sided tape but only on the inside edges.

With your card opened out, attach your oval overlapping the one you have just attached.

Then do the same with your other oval on the side so it looks like this.
 
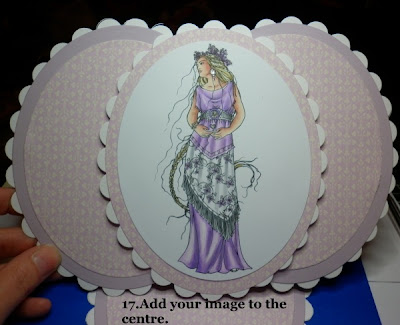
Add your image oval to the centre, i like to use to foam pads for this bit.

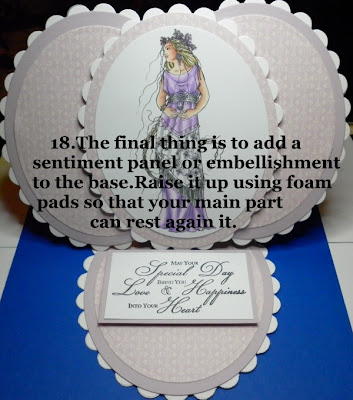
Finally add a sentiment or embellishment to act as a stop for your main easel.I use a sentiment as you can raise it on foam pads.
Then embellish how you like, one tip is to try and keep your embellishments to the centre of the card or it can tip it over if its too heavy on the outside.
 
And heres my finished card, i have used the beautiful Phlox Princess by Sara Burrier available HERE at the Crafts and Me store.
 
My 2nd card for today is using the stunning Unveiling the Heart by Sara Burrier available HERE at the Crafts and Me store.
This is the card i made for the current Crafts and Me challenge which you still have a little time to enter.Click HERE to see the fantastic DT cards and do pop back in the morning for a new challenge.
Gorgeous isn`t she.
Thanks so much for visiting and do pop on over to the Crafts and Me store and see all the goodies that Teresa has to offer.
Hugs Coops.xx


Monday, 27 August 2012

Some of My Favorite Stamp Artists

Hi there! This is Rose sharing three cards that I've made using some of the fabulous rubberstamp and digital images available at the Crafts and Me Stamps online store.

Crafts and Me Stamps carries an exclusive line of fabulous life-like stamps designed by one of their newest artists Zindy S.D. Nielsen. I've used Please Don't Let It Fly on a multi-layered card to share loving thoughts. You can find this image as a rubberstamp here.


The lovely Teresa at Crafts and Me Stamps sells Elisabeth Bell (EB) images from several rubber- and clear-stamp companies. You'll find EB images from Whiff of Joy, Sweet Pea Stamps, and Belles 'n Whistles!  I've used this sweet A Warm Fuzzy Hug rubberstamped image designed by EB for Sweet Pea Stamps.   She's available at the Crafts and Me Stamps online store here.


You may have seen this card at the current Dynamite Digi team's "Autumn Colors" challenge.  I've used a digi image named Smartie Pants, designed by Hannah Lynn, exclusively for Crafts and Me Stamps. She makes a great Back-to-School inspirational image!


* * * * * * * * *


You can find more wonderful rubberstamp and digital images by your favorite artists at the Crafts and Me Stamps store here.


* * * * * * * * *


You still have time to add your entry to the Crafts and Me Stamps' digi team's "Autumn Colors" challenge here for a chance to win THREE digi images from Crafts and Me!  Visit the Crafts and Me challenge blog again on Wednesday for a new Rockin' Rubbah challenge.


Here's wishing you a fantastic day!  We're so glad you stopped by to visit!

~ Rose

Sunday, 26 August 2012

A Little Bit of Love


Good morning folks its Gina here, sorry i'm late with this but its a bit manic in our house at the mo, anyway i have a card to show which i made for the last challenge for the rubber girls lol,i just love this beautiful image Just a Little love available HERE the Sizzix border down the right hand side is also available HERE at Crafts and Me.

Anyway here's my card


Well that's it from me i hope you are all enjoying your weekend whatever your doing.

Saturday, 25 August 2012

In the spotlight

Hi everyone,
Wow it is horrible weather today here in the UK I hope you are having a nicer day wherever you are. I wanted to spotlight some of you today. I have looked back and found a couple of my favourite creations from you :D
 
So here goes this amazing creation is from Lizzy and she has used the gorgeous Believe.
 

I love the way Lizzy has used the lace and border punch with all those tiny butterflies scattered around to bring it all to life.


And my second pick is Janice. Janice has used the beautiful Flapper girl Melody

I just love the way Janice has given her such a great retro style and I LOVE they way her hair has been coloured to have that great shine :D
 
Thank you all for all your inspiration and I hope you have a great rest of the weekend.
 
Huge hugs
 
Amy xx 


Wednesday, 22 August 2012

Misunderstood

Hello everyone, hope you're doing fine. Karina here to show you some more inspiration with the fabulous images from Crafts and Me

The first card I show you is made with one of the newest images by the amazing artist Robin Pushay. It is called 'Misunderstood'. This time I decided to kept it in creme and red. A colour combo I never tried before, but have to confess I quite like it.

I coloured the image with Distress Inks this time.

My second project I want to show you today is the tag I made for our last challenge, where we had the theme 'add some lace'. I used one of my favourite image by another brilliant artist Janna Prosvirina called 'Night Blossom'.

I coloured the image with Distress Inks as well, this time in monochromatic brown tones. I cut away her wings, but add some other ones made with feathers.

Hope you enjoyed your visit today. Have a magical day!
Hugs, Karina

Monday, 20 August 2012

April in August with Hannah Lynn

Hello all of our lovely friends its Vicky here to showcase one of my fave artists. As a lot of you will have noticed I've been off poorly for quite a while ill so when I started crafting again I struggled with my colouring as I hadnt coloured for 2 months........long time for me. However there is 1 artist that always gets my copic ink flowing & gets me colouring again & it is Hannah Lynn. Now I know I'm on the Rubbah Team but when I first started colouring I just stuck to digi images so I'm gonna show you 2 today.
This is the gorgeous 'April' you gotta love her hair!! These are my fave things to colour, hair & face so when Teresa first got Hannah Lynn rubber I was addicted from the start!!!!
I decided that this lady could def pull off a fabnulous colour so I coloured her hair blue. The straps I wanted to look leather so coloured them browns.
Next up I used 'Sadie's Dragon' you gotta love that cute little dragon, it reminds me of my little lizard I had as a pet years ago.....
Hasn't she got such a pretty face, but then havnt all of her images got pretty faces!!!
You can of course find Hannah Lynn digi images & rubber stamps at Crafts & Me along with such a lot of fabulous other goodies to fill your basket with. Go on go on a shopping frenzy, tell your partners I said you HAVE TO...........but please dont tell em where I live lol.

Well thats it from me lovelies but dont forget you still have time to enter Crafts & Me current challenge. For any more info on these cards pop over to my blog.

Thank you for popping by we really appreciate all of your support, toodles mmwah xxxx